
Highlights
Yakuman Tenpai?!?
Early on, Takamiya makes two early dragon calls 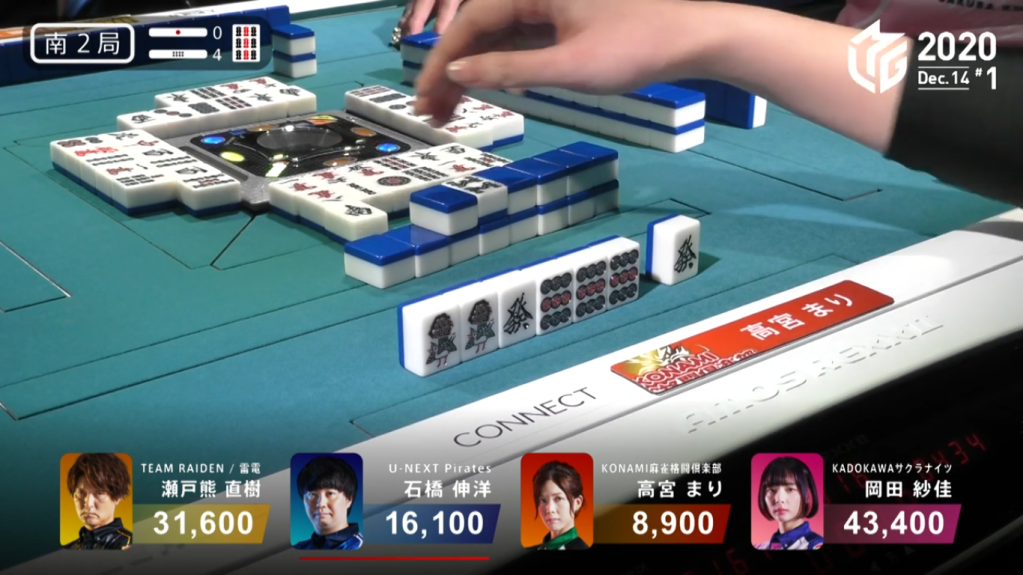
Later in the hand, after rejecting a simple two han tenpai, she switches to go for daisangen and eventually gets to tenpai 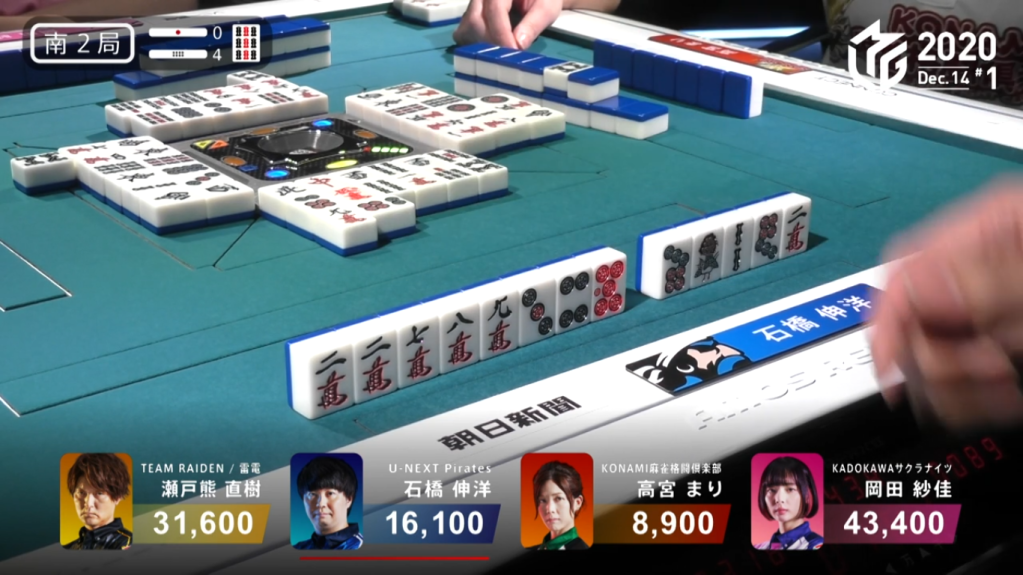
Ishibashi, despite seeing the two dragon calls, calls riichi on a 3s penchan 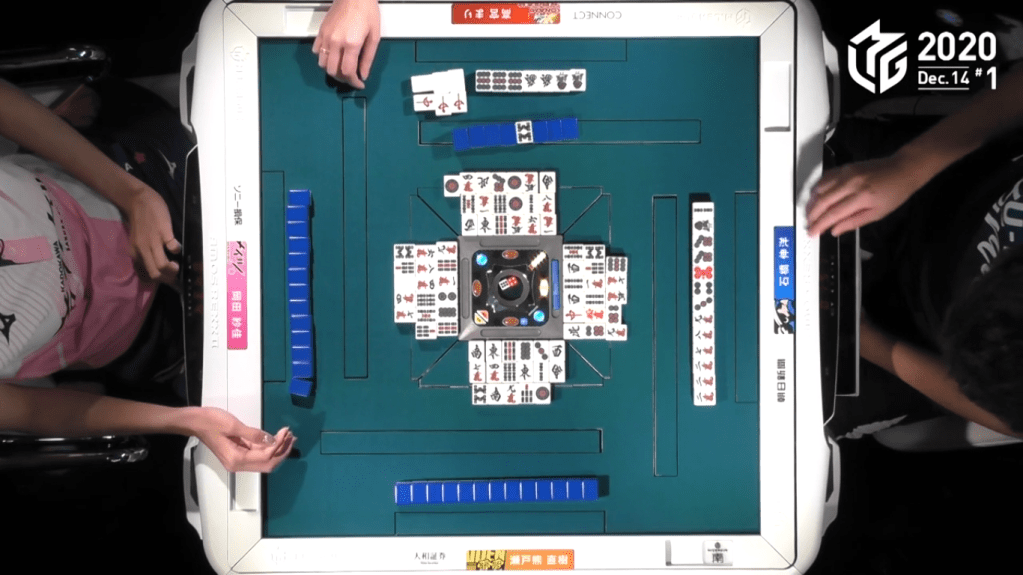
The hand ends up going to ryuukyoku with Takamiya and Ishibashi both in tenpai
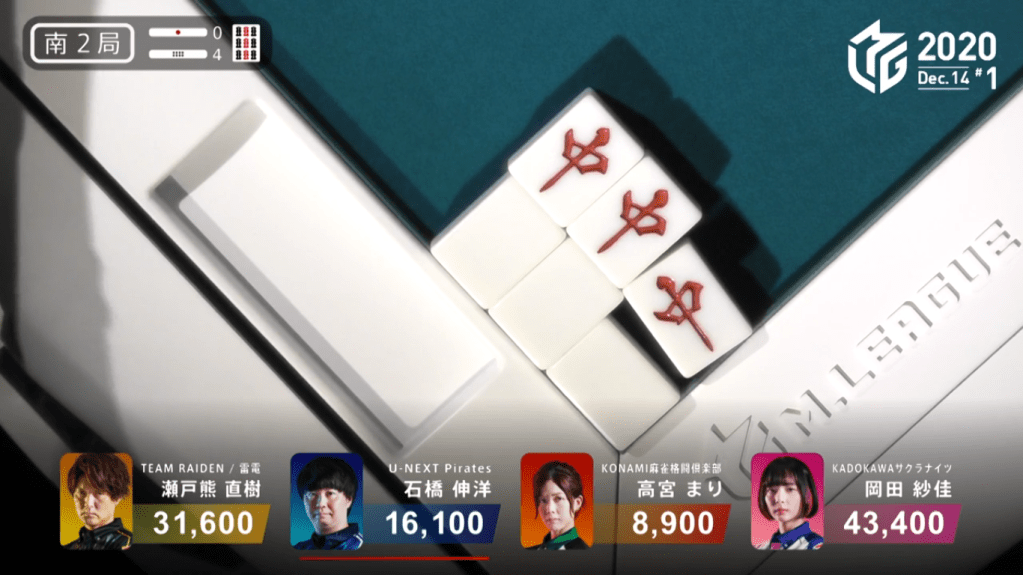
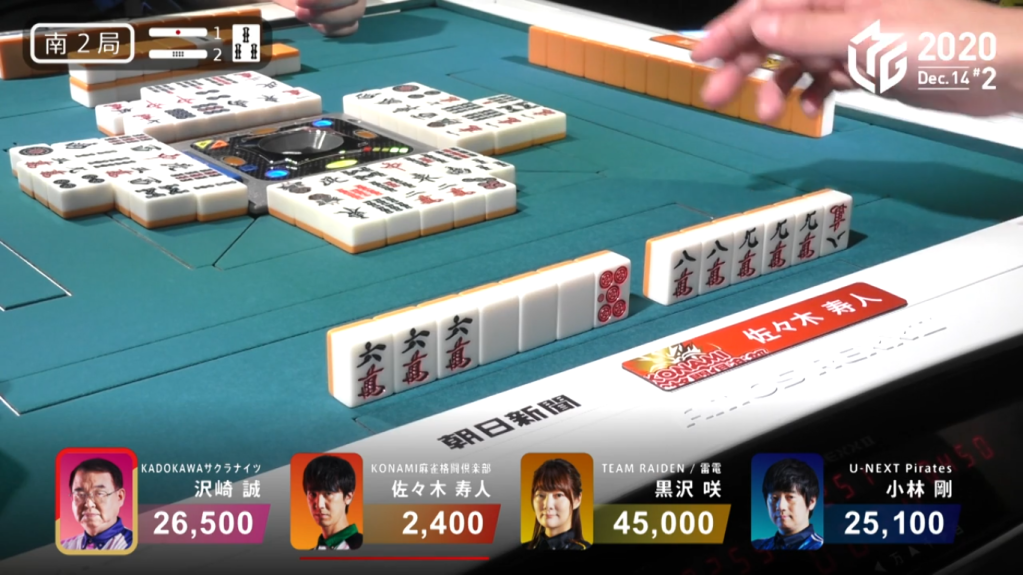
December 14, Game 1, S2-4
Video: https://abema.tv/video/episode/444-7_s30_p201
In S2-4, Takamiya is in 4th place and looking to capitalize on the four honba bonus on the table. Her hand starts out with two dragon pairs and an isolated dora, being 2-shanten for chiitoi and 3-shanten for a standard hand. On turn 4, Takamiya calls pon on the white dragon to put her into iishanten. Near the start of the 2nd row, Takamiya calls pon on the red dragon, putting her tenpai for 2-han hand with a 47s ryanmen wait. In the middle of the 2nd row, Takamiya draws a green dragon and breaks her tenpai to go for a bigger shousangen or daisangen. Cautiously, both Ishibashi and Setokuma get to advance their hands, with Setokuma even getting to tenpai on a 14s wait. At the start of the 3rd row, Takamiya gets to tenpai, waiting on the 1s/Green Dragon shanpon, with the green dragon giving her daisangen. Seeing Takamiya throw a tile from her hand (tedashi) instead of drawing and discarding (tsumogiri), Setokuma decides to start folding his hand. Even with no green dragon visible to Ishibashi, Ishibashi makes an extremely gutsy move and calls a dealer riichi on a 3s penchan wait. Seeing that there is only one green dragon left in the wall, both Pirates fans and Konami fans were anxious. In the end, the hand ended in ryuukyoku with Ishibashi and Takamiya both in tenpai.
In the post-game interview with Ishibashi, the interviewer, Matsumoto Kayo, asked Ishibashi what he would have done if he drew the green dragon. He replied, “I would eat it.”
Your Weekly Reminder of the Shortcut to Haneman

December 14, Game 2, E4-0
At the start of the hand, there was a short incident where Sawazaki almost drew a tile from the wrong part of the wall. However, it was a non-incident and no penalty was given.
After the short break for that ruling, the game continued. Kurosawa, who is in first place, starts out with four pairs, including a pair of souths, easts and dora. On turn 4, Kurosawa draws a 5th pair to become iishanten for chiitoi. On the very next turn, she gets to tenpai with a dama 2s wait for mangan. In the middle of the 2nd row, she calls riichi on a green dragon tanki to upgrade her hand to haneman. With one green dragon already out, it wasn’t very hard for it to come out, as Sasaki discards it on the ippatsu turn. Kurosawa wins the hand for Riichi/Ippatsu/Chiitoi/Dora 2/Aka 1 for 12,000
Yakuman Tenpai!?!
December 14, Game 2, S2-2
Video: https://abema.tv/video/episode/444-7_s30_p202
In S2-2 , Sasaki is in 4th place and looking to get out of it with his dealer turn. Sasaki starts off with a 6m ankou and a pair of both 8m and 9m, gearing his hand for a potential honitsu or chinitsu. By the end of the 1st row, Sasaki has two ankous, a pair of 8m and a pair of white dragon. However, the honitsu dream is ruined by a red 5p block in his hand. When Kobayashi discards the white dragon, Sasaki decides to not call it, possibly for a higher value hand like sanankou or suuankou. The gamble pays off, with Sasaki drawing the last white dragon to get to mangan tenpai on a 6p kanchan wait. He stays dama, giving himself a chance to go for suuankou. However, the dream becomes much more difficult to attain when Sawazaki calls riichi at the start of the 3rd row, waiting on a 58p ryanmen wait. Sasaki continues to push, especially with a mangan tenpai as dealer in last place. On Sasaki’s second last draw, Sasaki draw the 8m to make his fourth ankou and be tenpai on a 5p tanki. However, with no more left in the wall, the dream had no chance of becoming true and the hand ends in ryuukyoku with Sasaki and Sawazaki being tenpai
It’s important to note that due to atamahane, if Kurosawa or Kobayashi had discarded a 5p, Sawazaki would have won and not Sasaki, creating an even sadder situation.
Stop It! We’re Already Dead!
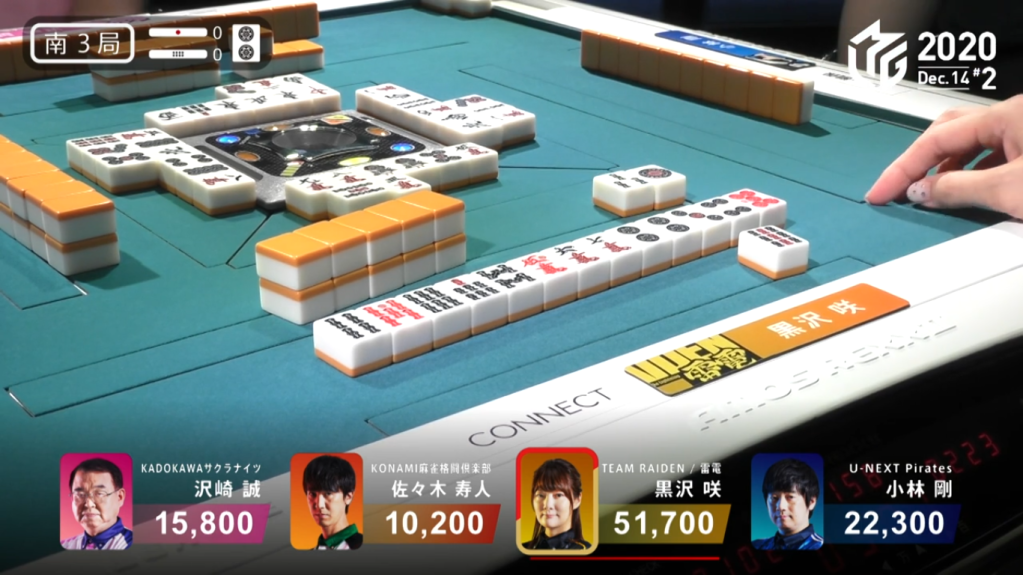
December 14, Game 2 , S3-0
Video: https://abema.tv/video/episode/444-7_s30_p204
In S3-0, Kurosawa is in 1st place with 51,700 and 29,400 ahead of 2nd place Kobayashi. Kurosawa starts out with a 2-shanten hand with two dora and a sanmenchan. Trying to rush the hand and get to his dealership quickly, Kobayashi immediate makes a white dragon pon. However, even with the speed, Kurosawa is still faster. By turn 4, Kurosawa draws two red dora. On turn 5, Kurosawa gets rid of her 1s pair for tanyao. On turn 6, she draws the 3rd red 5 for a haneman minimum hand. On turn 5, she gets to iishanten and at the start of the 2nd row, she gets to tenpai on a 369s sanmenchan wait. Even though the hand is already worth haneman and the fact that she already has an incredible lead, Kurosawa decides to call riichi anyway. Two turns later, she draws the 9s to win the hand. Revealing one uradora, she wins with Riichi/Tsumo/Pinfu/Dora 2/Aka 3/Ura 1 for 8,000 all. This win brings her score up to 75,700 and puts her 61,400 points ahead of 2nd place Kobayashi.
Prime Example of Raiden Mahjong
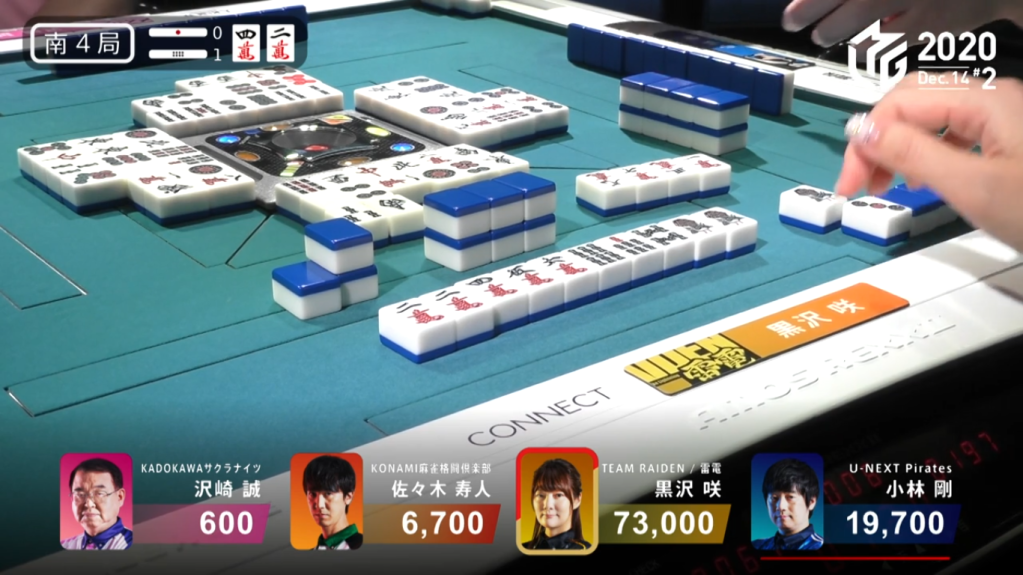
December 14, Game 2, S4-1
In S4-1, Kurosawa already has a significant lead and is looking to close the game out before Kobayashi has a chance to catch up. She starts out with a poor 5-shanten hand holding a dora. After discarding honours and isolated tiles, her hand fares a bit better, being 3-shanten with kanchan shapes. Over the next two turns, she fills in those kanchan shapes and becomes iishanten. Having previously had a slow hand, Kobayashi tries to call to speed up his hand. However, it wasn’t fast enough. On the next turn, Kurosawa gets to tenpai on a 3m penchan dama and calls riichi on the next turn, switching to a 1s/2m shanpon wait. Since Kobayashi was would need to deal into a haneman from Kurosawa to fall out of 2nd, Kobayashi continued to push his hand to try to get closer to tenpai. Near the start of the 3rd row, Kurosawa draws a 4th 3p and calls kan, even though she’s in the lead. With the kan, her 2m pair becomes a dora pair to bring her hand up to mangan. One turn later, Kurosawa draws the 1s to win the hand. Kurosawa wins with Riichi/Tsumo/Dora 3 for 2,000+100/4,000+100.
With the win, she ends the game with 81,300, the highest single game score this season and the 6th highest game in M-League history.
Say Bye Bye With a Baiman
December 15, Game 2, S3-1
Video: https://abema.tv/video/episode/444-7_s30_p209
In S3-1, Kayamori is in 2nd place and is looking to overtake nearby Katsumata for 1st place. Her starting hand holds a lot of potential, holding 9 pinzu tiles, most of them near the middle. During turns 2, 3 and 4, she draws more pinzu, putting her iishanten for chinitsu with a good wide wait potential. At the end of the 1st row, Kayamori picks up her 13th pinzu tile to put her to tenpai with a 147p sanmenchan wait. If she wins on the 7p, her hand is a haneman for Chinitsu/Pinfu. If she wins on the 4p, she gets to baiman with Chinitsu/Pinfu/Iipeikou. If she wins on the 1p, she gets baiman with Chinitsu/Pinfu/Ittsuu/Iipeikou with a chance at sanbaiman if she draws the 1p by tsumo. With the worst luck, Taro draws and discards the 1p to deal into Kayamori. Kayamori wins the hand with Chinitsu/Pinfu/Ittsuu/Iipeikou for 16,000+300, plunging her to 1st place and Taro to 3rd. Taro would end up going last by the end of the game, marking one of the most tragic 4ths in M-League.
Yakuman Tenpai??!
December 17, Game 1, S1-1
Video: https://abema.tv/video/episode/444-7_s30_p212
In S1-1, Wakutsu is in 2nd place and looking to stop Aki’s dealer turn before she gets too far ahead. She starts out with an ankou of norths, a pair of easts and a single west. Unfortunately, being the south seat in the south round, it doesn’t help her get any yaku, despite the slightly distant shousuushii. On turn 2, she manages to pair up the wests to put her closer to honitsu and shousuushii. Soon after, she calls pon on the east to confirm at least a honitsu. The very next turn, she puts herself to iishanten by calling pon on the west. For many turns, Wakutsu waits to get to tenpai while everyone else stays extremely wary of discarding any honour tiles. It’s not until the end of the 2nd row that Wakutsu gets to tenpai, waiting on a green dragon tanki. Wakutsu continues to wait, with everyone folding because they have difficult to handle souzu and honours. On Wakutsu’s very last draw, the last tile in the wall, Wakutsu draws the south and switches out the green dragon to be shousuushii tenpai. With that discard, the hand went to ryuukyoku with only Wakutsu in tenpai.
Early Riichi, Early Trap
December 17, Game 2, S1-3
In S1-3, Matsumoto is the dealer in 1st place with Hagiwara hot on his heels. Matsumoto starts out with an incredible iishanten hand with two dora. On turn two, Matsumoto draws a 3m. With his 23m block already being a ryanmen and his hand already having 5 distinct blocks, he decides not to give any extra information and discards the 3m right away. On turn 4, Matsumoto fills in a bad penchan wait and becomes tenpai, calling riichi on a 14m ryanmen wait. With an early riichi, the only tiles that players have to determine safe tiles are the early tiles. Since the 3m was discarded early, it would normally mean that he would be waiting on a 1m or 2m. With Hagiwara in iishanten and 1m being the safest tile, he discards the 1m and deals into Matsumoto. Matsumoto wins the hand for Riichi/Pinfu/Dora 2/Ura 1 for 12,000+900.
This hand was the turning point in the game, where Hagiwara’s dreams fo getting first place were dashed. Hagiwara ended up getting 2nd with 42,400 by the end of the game, but because of that hand, he couldn’t find the top spot.
Dealer Benefits
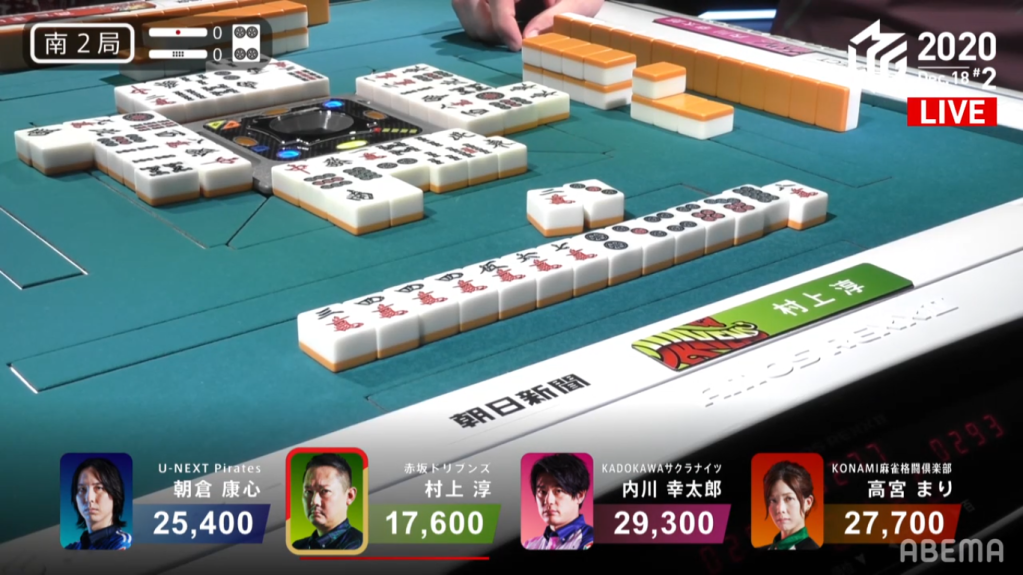
December 18, Game 2, S2-0
Video: https://abema.tv/video/episode/444-7_s30_p219
In S2-0, Murakami is in 4th place and the dealer, looking to take advantage of the dealer benefits. His hand starts out quite modest, having two completed melds but still 3-shanten. His hand progress fairly quickly, getting to iishanten by turn 4 and having a guaranteed good wait whichever way he gets to tenpai with. In the middle of the 2nd row, Murakami gets to tenpai and calls riichi on a wide 2358m wait, holding a guaranteed 7,700 minimum hand. Being the dealer, it scared Takamiya enough to make her fold her iishanten hand. in the middle of the 3rd row, Murakami draws the 8m to win the hand. Murakami wins the hand with Riichi/Tsumo/Pinfu/Tanyao/Dora 1/Ura 1 for 6,000 all and catapults him to 1st place.
