Have you ever seen 7 ippatsu wins in a single game? Have you ever seen a game last 21 rounds? Have you ever seen a hand with 9 dora? Have you ever seen a player get to 82,500 with the game not even a quarter of the way finished? Have you ever seen a game where a player has gets to below -25,000 and manages to work their way back up to 2nd place? Have you seen all that in a single game, plus a furiten riichi, plus a player who calls riichi 11 times? On January 12, 2021, Game #111 of the season, we witnessed a game that had all these elements and made for some exciting fun! Today, I will go through every single hand so you can see how this whole game went down.
Video: https://abema.tv/video/episode/444-7_s1_p111 (Note that the video will only be available for free for 72 hours after broadcast. After 72 hours, it will only be available to users with Abema Premium.)
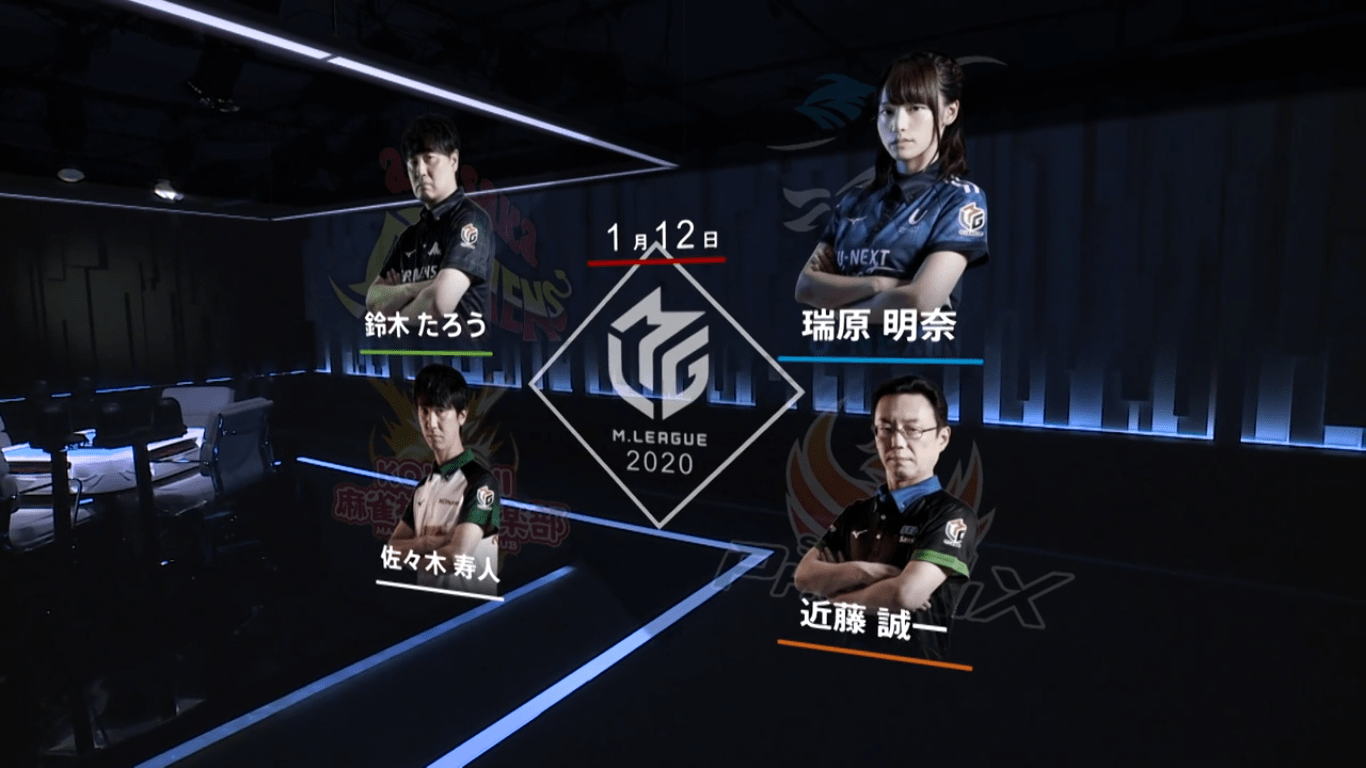
Players

U-Next Pirates⠀

Sega Sammy
Phoenix


Konami Mahjong
Fight Club

Akasaka
Drivens
E1-0

Dealer: Mizuhara Akina
Dora: West
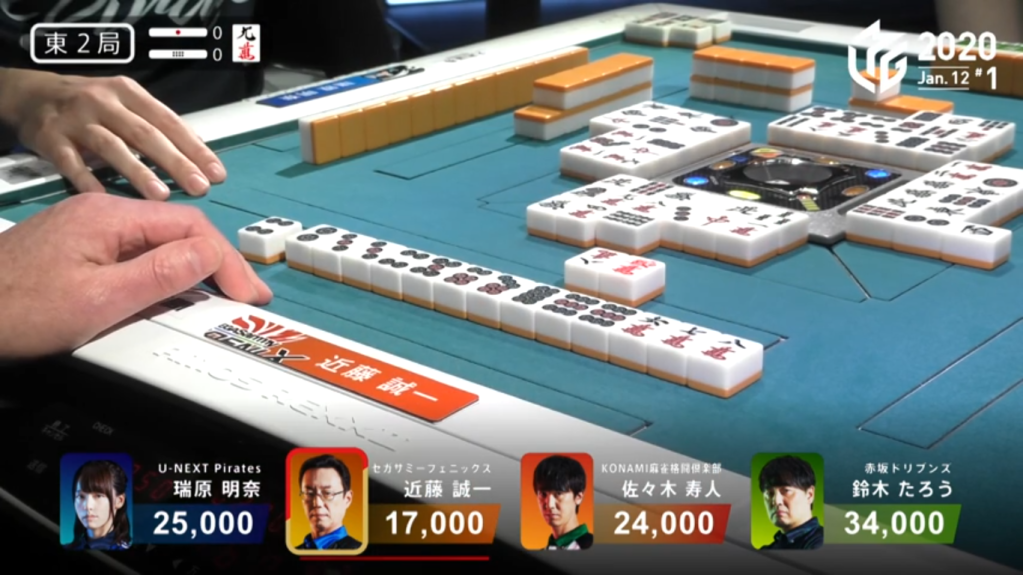
In E1-0, Sasaki starts out with the best hand, being 2-shanten. On turn 2, Sasaki gets to iishanten for tanyao and a decent chance to call riichi. On turn 4, Sasaki gets to tenpai and calls riichi on a 6s/8s shanpon wait. With Taro getting to iishanten immediately after, he pushes his hand while Mizuhara and Kondo both try to work around the riichi. All three of them get to iishanten by the start of the 2nd row. On turn 8, Taro gets to tenpai and calls riichi on a 6p kanchan. On Taro’s ippatsu turn, Kondo gets to tenpai as well and tries to call riichi by discarding the 6p. Taro calls ron and wins the hand with Riichi/Ippatsu/Tanyao/Aka 1 for 8,000, plus Sasaki’s riichi stick.
East 1 – Honba 0
Kondo Seiichi (8,000) → Suzuki Taro (Riichi/Ippatsu/Tanyao/Aka 1)
Riichi: Sasaki Hisato, Suzuki Taro
⠀⠀
U-Next Pirates
25,000
⠀
-8,000
Sega Sammy
Phoenix
17,000
-1,000⠀
Konami Mahjong
Fight Club
24,000
+1,000
+8,000
Akasaka
Drivens
34,000
E2-0
Dealer: Kondo Seiichi
Dora: 9m
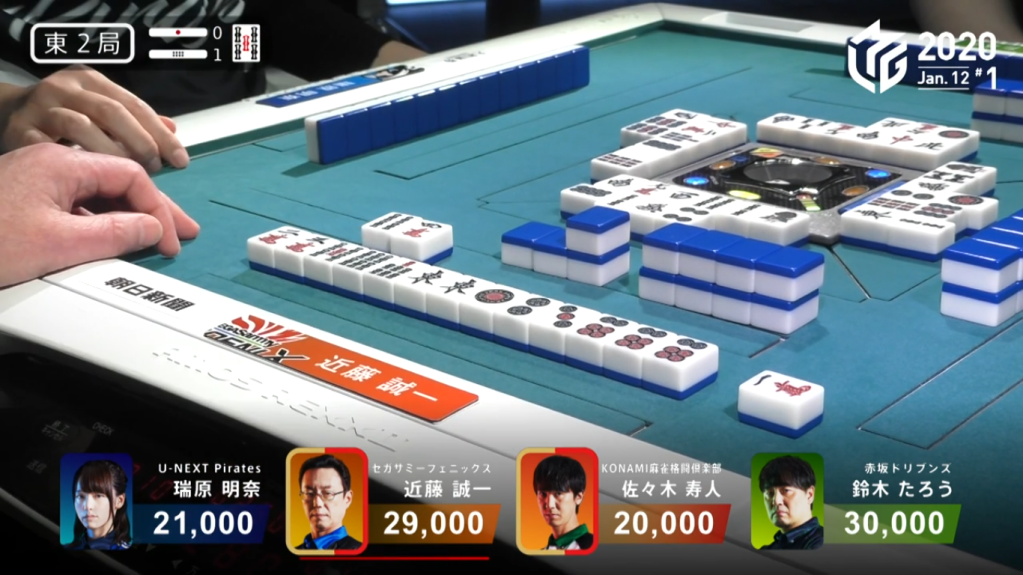
In E2-0, Kondo starts out with a 4-shanten hand with some potential for honitsu. Sasaki starts out with a 3-shanten hand, but with two penchans, it will be difficult for him to build his hand. By the end of the 1st row, Kondo gets to 3-shanten for a hand geared towards riichi only and Sasaki still struggles at 3-shanten. By this point, Mizuhara is 2-shanten with an almost guaranteed good wait if she gets to tenpai. Approaching the middle of the 2nd row, Taro tries to rush his hand with an open ittsuu by calling chii. Near the start of the 3rd row, everyone but Sasaki is iishanten. The first of them to get to tenpai is Taro, who calls chii to wait on a 3s penchan. Soon after, Kondo gets to tenpai and calls riichi on a 14p ryanmen wait. On his ippatsu turn, he draws the 4p to win the hand. Kondo wins with Riichi/Ippatsu/Tsumo/Pinfu/Ura 1 for 4,000 all.
East 2 – Honba 0
All Opponents (4,000 all) → Kondo Seiichi (Riichi/Ippatsu/Tsumo/Pinfu/Ura 1)
Riichi: Kondo Seiichi
⠀
-4,000
U-Next Pirates
21,000
⠀
+12,000
Sega Sammy
Phoenix
29,000
⠀
-4,000
Konami Mahjong
Fight Club
20,000
⠀
-4,000
Akasaka
Drivens
30,000
E2-1
Dealer: Kondo Seiichi
Dora: 5s
In E2-1, Kondo start out with a pair of easts, meaning that he can potentially pon a double east to speed up his 4-shanten hand. Sasaki’s hand starts much better than Kondo’s, being 2-shanten. Even though Sasaki’s first discard is the east, Kondo decides not to call pon. Looking at Mizuhara’s hand, she gets to Junchan/Sanshoku 2-shanten by turn 3. On turn 4, Sasaki gets to iishanten and on turn 5, Kondo gets to iishanten as well. At the start of the 2nd row, Kondo draws the dora to complete a ryanmen and calls riichi on a 14m ryanmen. Two turns later, Sasaki chases Kondo with a 36p ryanmen wait for mangan minimum. With both Mizuhara and Taro bailing, it was just a tsumogiri battle between the Sasaki and Kondo. In the middle of the 2nd row, Sasaki discards the 1m to give Kondo the win. Kondo wins the hand with Riichi/Dora 1 for 3,900+300 and takes Sasaki’s riichi stick with him.
East 2 – Honba 1
Sasaki Hisato (3,900+300) → Kondo Seiichi (Riichi/Dora 1)
Riichi: Kondo Seiichi, Sasaki Hisato
⠀⠀
U-Next Pirates
21,000
+1,000
+4,200
Sega Sammy
Phoenix
34,200
-1,000
-4,200
Konami Mahjong
Fight Club
14,800
⠀⠀
Akasaka
Drivens
30,000
E2-2

Video: https://abema.tv/video/episode/444-7_s30_p276
Dealer: Kondo Seiichi
Dora: 4s
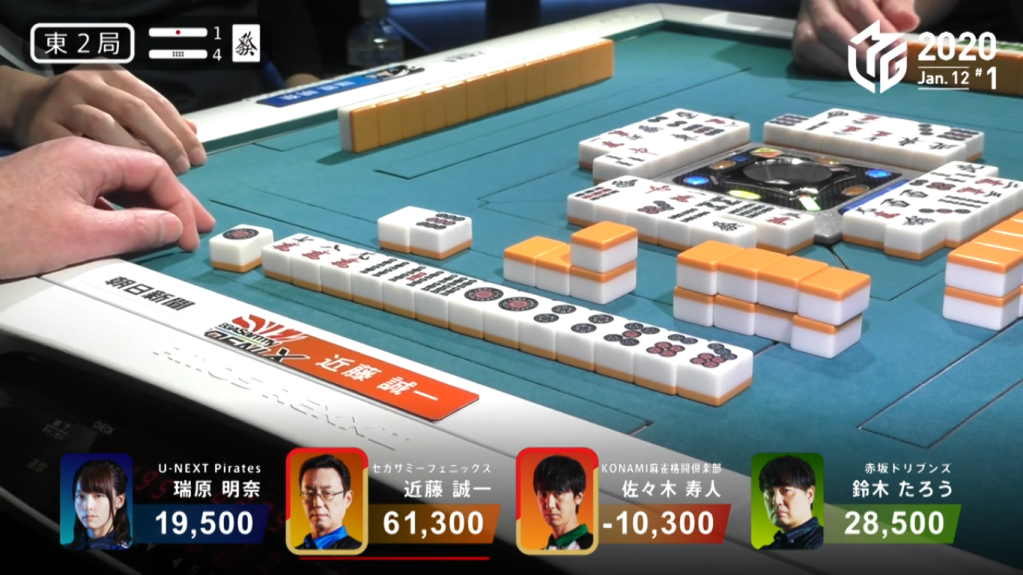
In E2-2, Konoo starts out 2-shanten with a dora and a red dora. He also holds potential for a 345 sanshoku or double east or both. On turn 5, Kondo gets to iishanten, but he fails to get either sanshoku (having drawn the 2s instead of the 5s) or double east. On the very next turn, however, he draws a 2s to form a 2234s shape. With the shape, he can have the potential of a 345 sanshoku and double east again, either creating a shanpon on 2s/east or a 25s ryanmen. He goes back a shanten in order to maintain this good shape. The gamble pays off, drawing the red 5s to get to iishanten near the start of the 2nd row. Two turns later, he draw the red 5m to get the confirmed sanshoku an be in tenpai on a 2s/east shanpon. He decides not to call riichi, already holding a haneman minimum hand with a chance at baiman if he gets the east. At the end of the 2nd row, Sasaki puts pressure on Kondo by calling riichi on his chiitoi and waiting on the green dragon. Kondo continues to push his hand because of the high value of his hand. Two turns after Sasaki’s riichi, Kondo decides to call riichi himself, maintaining the same 2s/east shanpon wait. Sasaki next draw happened to be the east, which caused Sasaki to deal into Kondo. Kondo wins a monster Riichi/Ippatsu/Double East/Sanshoku/Dora 1/Aka 3 for 24,000+600, taking Sasaki’s riichi stick to add insult to injury. With the game not even a quarter of the way through, Sasaki was already in the deep negatives at -10,800.
East 2 – Honba 2
Sasaki Hisato (24,000+600) → Kondo Seiichi (Riichi/Ippatsu/Double East/Sanshoku/Dora 1/Aka 3)
Riichi: Kondo Seiichi, Sasaki Hisato
⠀⠀
U-Next Pirates
21,000
+1,000
+24,600
Sega Sammy
Phoenix
59,800
-1,000
-24,600
Konami Mahjong
Fight Club
-10,800
⠀⠀
Akasaka
Drivens
30,000
E2-3
Dealer: Kondo Seiichi
Dora: 7s
In E2-3, Taro and Mizuhara start out the closest to tenpai, being 3-shanten. However, none of the players have particularly interesting or valuable hands. On turn 3, Kondo has his hand improving well, with two ryanmen and a pair of red dragons at 2-shanten. At the end of the 1st row, Taro is the only one iishanten, but his two kanchan shapes with no value will make it difficult for him to win. At the start of the 2nd row, Kondo gets to iishanten as well, though the chiitoi is also difficult to get to tenpai with. To improve his chances, he calls pon on the red dragon and instead goes for a cheap standard hand iishanten. Soon after, Kondo calls pon on the south to get to tenpai on a 6m/5s shanpon wait, which he later switches to a 6s kanchan wait. In the middle of the 2nd row, all the players are at iishanten or better. The next player to get to tenpai is Sasaki, who calls riichi near the start of the 3rd row on a 3s/7s shanpon wait. With Taro and Mizuhara already folding after Kondo’s second call, it was again a battle between him a Sasaki. In the end, the hand goes to ryuukyoku with Sasaki and Kondo both in tenpai.
East 2 – Honba 3
Mizuhara Akina/Suzuki Taro (1500 all) → Kondo Seiichi/Sasaki Hisato (Ryuukyoku)
Riichi: Sasaki Hisato
⠀
-1,500
U-Next Pirates
19,500
⠀
+1,500
Sega Sammy
Phoenix
61,300
-1,000
+1,500
Konami Mahjong
Fight Club
-10,300
⠀
-1,500
Akasaka
Drivens
28,500
E2-4
Dealer: Kondo Seiichi
Dora: Green Dragon
In E2-4, it was another round of poor starting hands, with everyone 4-shanten or worse. With the standard procedure of discarding terminals and honours in the first row, everyone had their hands improve. By the end of the 1st row, Mizuhara and Sasaki are at iishanten while Kondo and Taro are at 2-shanten. At the start of the 2nd row, Sasaki gets to tenpai and calls riichi on a 7s kanchan wait, his 5th riichi in 6 hands. With many of the tiles that Kondo was going to get rid of anyway being safe, Kondo advances closer to tenpai, getting to iishanten in the middle of the 2nd row. A turn after getting to iishanten, Kondo gets to tenpai and calls riichi on a 1p/2p shanpon wait. On Kondo’s ippatsu draw, he finds the 1p to win the hand. Revealing the 9p as the uradora indicator, his hand suddenly becomes 3 han more expensive to bring his hand up to haneman. Kondo wins with Riichi/Ippatsu/Tsumo/Ura 3 for 6,000+400 all, as well as Sasaki’s riichi stick from this and the previous hand.
East 2 – Honba 4
All Opponents (6,000+400 all) → Kondo Seiichi (Riichi/Ippatsu/Tsumo/Ura 3)
Riichi: Kondo Seiichi, Sasaki Hisato
⠀
-6,400
U-Next Pirates
13,100
+2,000
+19,200
Sega Sammy
Phoenix
82,500
-1,000
-6,400
Konami Mahjong
Fight Club
-17,700
⠀
-6,400
Akasaka
Drivens
22,100
E2-5
Dealer: Kondo Seiichi
Dora: 5p
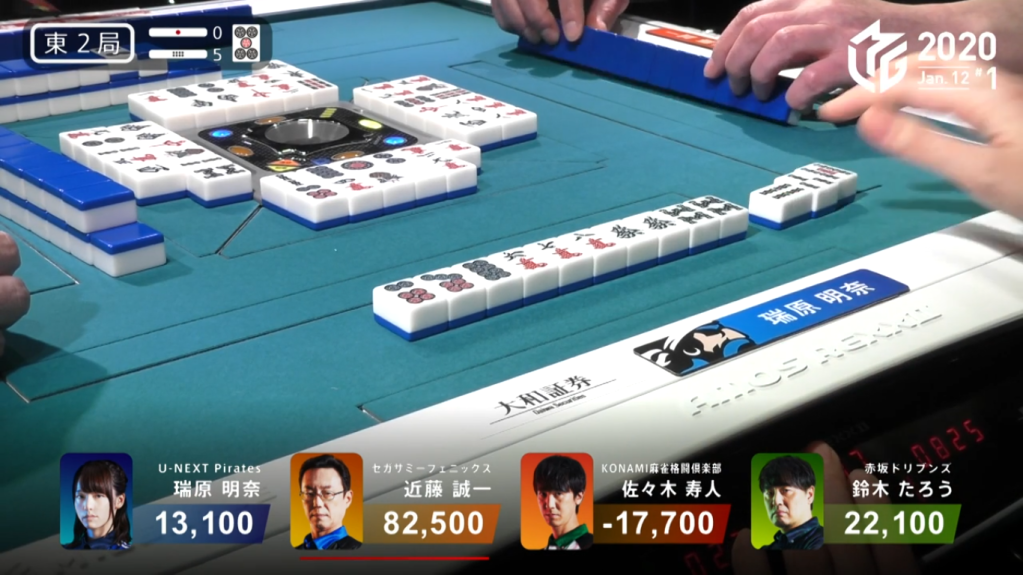
In E2-5, Mizuhara starts out with the most interesting hand, being iishanten with a pair of green dragons. Progress is slow for her but quite quick for the other players, as Kondo and Taro get to 2-shanten and Sasaki has a callable tanyao hand by the end of the 1st row. With Sasaki’s callable hand, he makes a pon on the 3p to get him to 2-shanten with two dora. Around the start of the 2nd row, all players are iishanten. The first of them to get to tenpai is Sasaki, who does so with a mangan tenpai with a 25s ryanmen wait. Soon after, Mizuhara calls chii on the 4s to get rid of her kanchan. She puts herself into an atozuke tenpai, waiting on a 8s/Green Dragon tenpai, where the green dragon is the only tile to give a yaku. At the start of the 3rd row, Sasaki discards the green dragon and deals into Mizuhara. Mizuhara wins the hand with Green Dragon only for 1,000+1,500
East 2 – Honba 5
Sasaki Hisato (1,000+1,500) → Mizuhara Akina (Green Dragon)
Riichi: None
⠀
+2,500
U-Next Pirates
15,600
⠀⠀
Sega Sammy
Phoenix
82,500
⠀
-2,500
Konami Mahjong
Fight Club
-20,200
⠀⠀
Akasaka
Drivens
22,100
E3-0
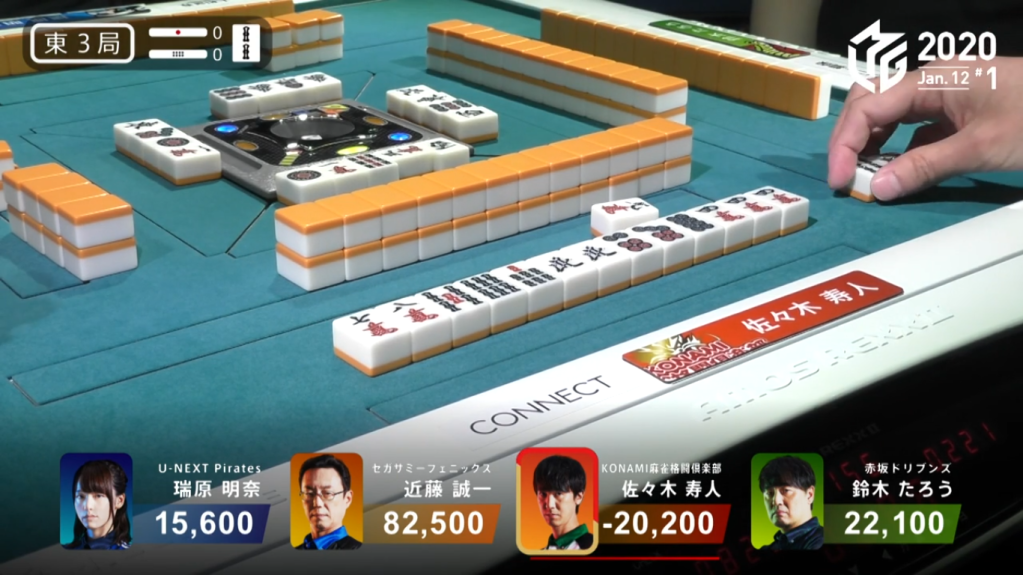
Dealer: Sasaki Hisato
Dora: 2s
In E3-0, Sasaki starts out with a 2-shanten hand, but he will most likely have to draw the tiles himself and riichi the hand. Sasaki gets to iishanten on turn 3 and on turn 4, he gets to tenpai and calls riichi on a 69m ryanmen wait. With nothing much to go on and other players wanting to push their hands, the 9m comes out quickly from Taro’s hand. Sasaki wins the hand with Riichi/Ura 1 for 3,900.
East 3 – Honba 0
Suzuki Taro (3,900) → Sasaki Hisato (Riichi/Ura 1)
Riichi: Sasaki Hisato
⠀⠀
U-Next Pirates
15,600
⠀⠀
Sega Sammy
Phoenix
82,500
⠀
+3,900
Konami Mahjong
Fight Club
-16,300
⠀
-3,900
Akasaka
Drivens
18,200
E3-1
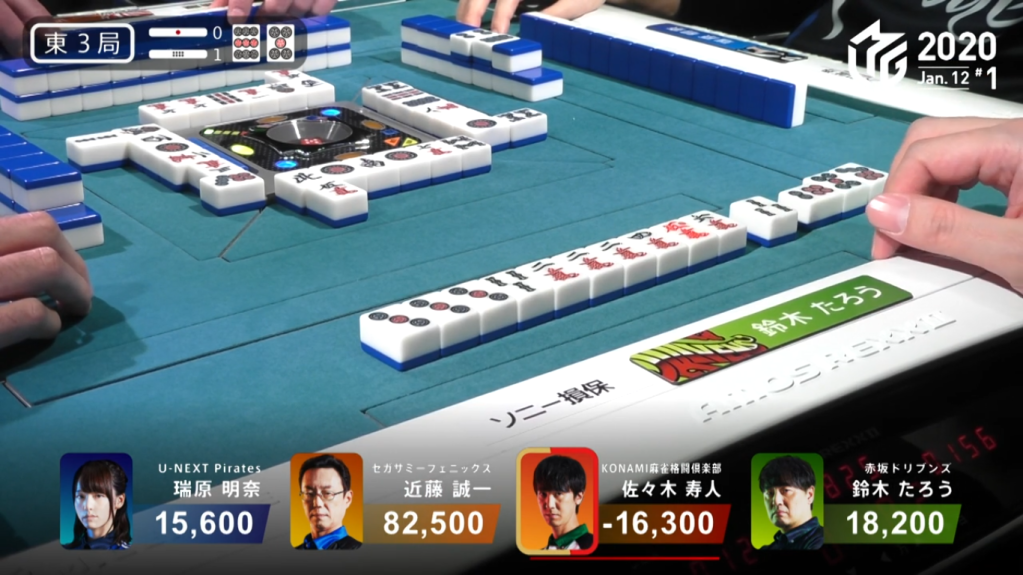
Dealer: Sasaki Hisato
Dora: 9p
In E3-1, Sasaki starts out with a 2-shanten hand filled with bad shapes while Kondo and Taro start out 3-shanten. On turn 2, Taro shapes his hand to be tanyao based, converting his lone terminal block. By turn 4, Sasaki is down to iishanten and tries to get to tenpai by calling kan on turn 5. The gamble pays off, with the 6s rinshan filling one of his kanchan and letting Sasaki call riichi on a 5p kanchan wait. Taro, who has two dora in his hand, calls chii on Sasaki’s riichi tile to get him to iishanten. Two turns later, Taro gets to tenpai and waits with a 3s tanki wait. On his very next turn, he draws the 3s to win the hand. Taro wins with Tanyao/Dora 2 for 1,300+100/2,600+100. This is one of the rare times when an open tanyao hand gets to 40 fu, with Taro doing so with two concealed ankou of inside tiles and winning by tsumo on a tanki.
East 3 – Honba 1
All Opponents (1,300+100/2,600+100) → Suzuki Taro (Tanyao/Dora 1/Aka 1)
Riichi: Sasaki Hisato
⠀
-1,400
U-Next Pirates
14,200
-1,400
Sega Sammy
Phoenix
81,100
-1,000
-2,700
Konami Mahjong
Fight Club
-20,000
+1,000
+5,500
Akasaka
Drivens
24,700
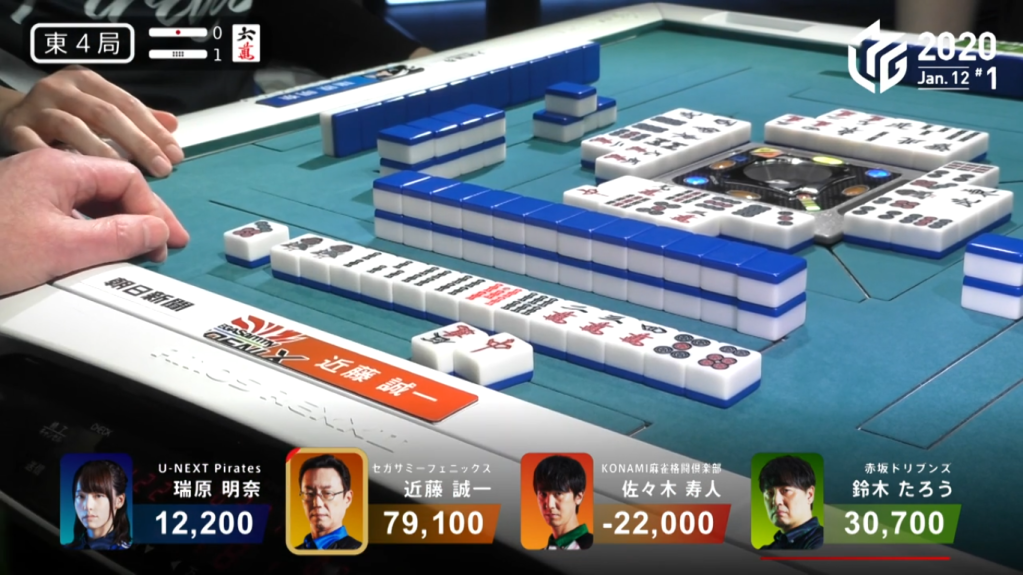
E4-0
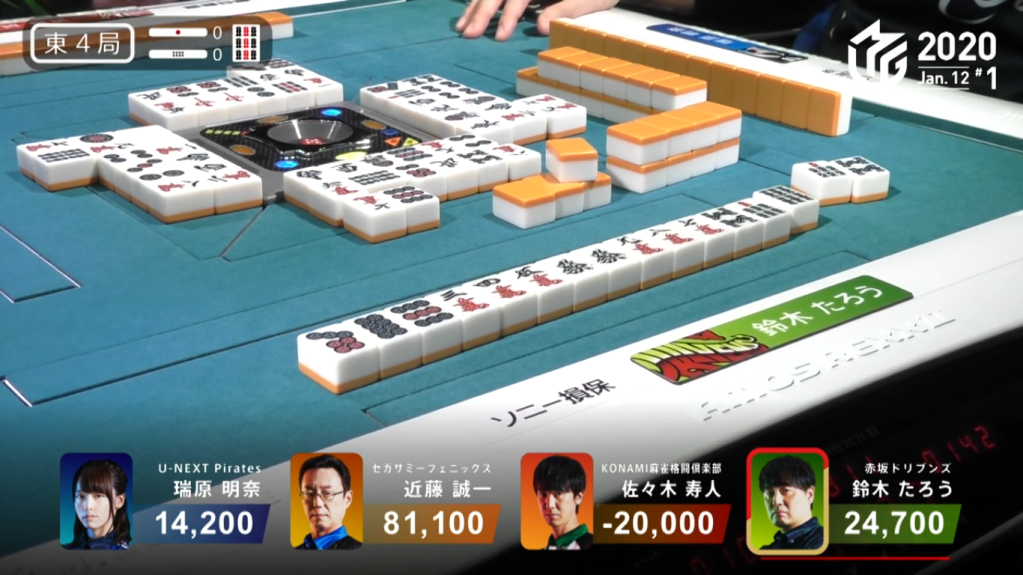
Dealer: Suzuki Taro
Dora: 9s
In E4-0, Taro starts out with a 2-shanten hand, but lacks a pair. He finds a pair on turn 2 to put him in iishanten. On turn 3, he fills in his kanchan and stays dama on a no-yaku 25m ryanmen wait. Even with Sasaki discarding the 2m and other players discarding middle tiles, Taro stays dama. At the start of the 2nd row, Taro draws his winning 5m, but decides to call furiten riichi. He chooses the 69s ryanmen wait, with the 9s giving both dora and sanshoku. Everyone starts to bail, giving Taro time to draw his winning tile. In the middle of the 3rd row, Taro draws the yasume 6s and takes the win. Revealing an uradora, Taro wins the hand with Riichi/Tsumo/Ura 1 for 2,000 all.
East 4 – Honba 0
All Opponents (2,000 all) → Suzuki Taro (Riichi/Tsumo/Ura 1)
Riichi: Suzuki Taro
⠀
-2,000
U-Next Pirates
12,200
⠀
-2,000
Sega Sammy
Phoenix
79,100
⠀
-2,000
Konami Mahjong
Fight Club
-22,000
⠀
+6,000
Akasaka
Drivens
30,700
E4-1
Dealer: Suzuki Taro
Dora: 6m
In E4-1, Taro starts out with a 2-shanten hand with two dora and two ryanmen. Kondo starts out in a similar position, though he only has one dora. By turn 4, Taro is iishanten and Kondo has gotten rid of his penchan wait for pinfu. At the start of the 2nd row, Kondo gets to tenpai and calls riichi on a 47p ryanmen wait. Four draws later, Kondo draws the 7p to win the hand. He wins it with Riichi/Tsumo/Pinfu/Aka 1 for 1,300+100/2,600+100 to have 84,600 heading into the south round.
East 4 – Honba 1
All Opponents (1,300+100/2,600+100) → Kondo Seiichi (Riichi/Tsumo/Pinfu/Aka 1)
Riichi: Kondo Seiichi
⠀
-1,400
U-Next Pirates
10,800
⠀
+5,500
Sega Sammy
Phoenix
84,600
⠀
-1,400
Konami Mahjong
Fight Club
-23,400
⠀
-2,700
Akasaka
Drivens
28,000
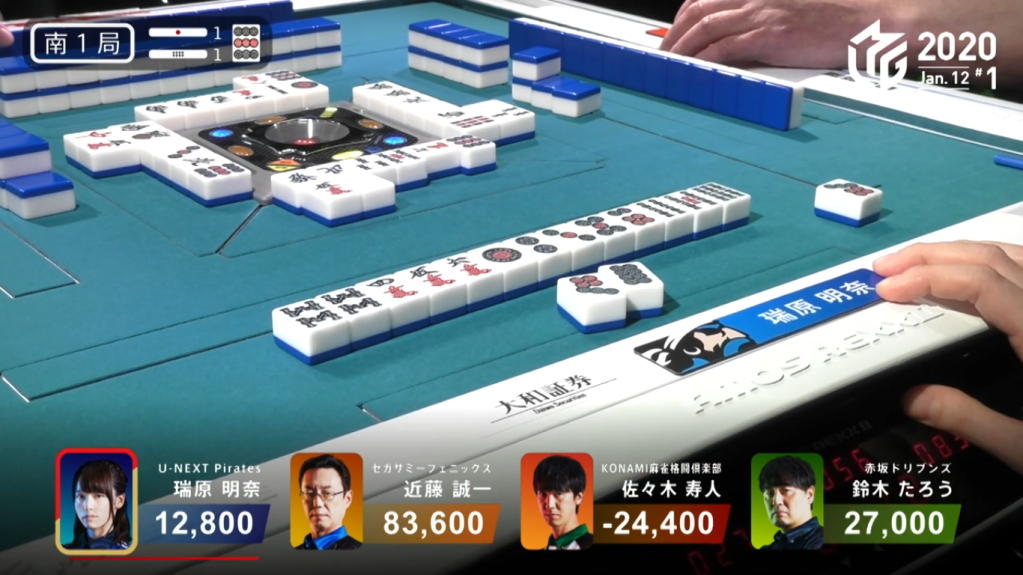
S1-0
Dealer: Mizuhara Akina
Dora: 1p
In S1-0, Mizuhara starts out with a 4-shanten, while Kondo starts out with a 2-shanten hand. As we pan towards Sasaki’s starting hand, we notice that both Sasaki and Kondo have a white dragon pair, essentially stalling both their hands from advancing well. By turn 5, Mizuhara has advanced her hand considerably, getting to iishanten with a wide wait to get to tenpai. At the start of the 2nd row, Mizuhara gets to tenpai and calls riichi on a 7p kanchan wait that also gives her sanshoku. With a dealer riichi with no dora visible, all players fold and continue to fold for the rest of the hand. The hand ends with Mizuhara the only player tenpai at ryuukyoku.
South 1 – Honba 0
All Opponents (1,000 all) → Mizuhara Akina (Ryuukyoku)
Riichi: Mizuhara Akina
-1,000
+3,000
U-Next Pirates
12,800
⠀
-1,000
Sega Sammy
Phoenix
83,600
⠀
-1,000
Konami Mahjong
Fight Club
-24,400
⠀
-1,000
Akasaka
Drivens
27,000
S1-1
Dealer: Mizuhara Akina
Dora: 9p
In S1-1, Mizuhara starts out 2-shanten with a ryanmen in hand. By turn 3, she has a chance to be iishanten with a decent chance at pinfu, but prefers to keep her chances at sanshoku open and stays 2-shanten. She gets to iishanten with both these options the next turn and on the turn after that, she calls riichi on a 47p ryanmen wait. If Mizuhara manages to get the 4p, it would sanshoku and give her a dealer mangan. In the middle of the 2nd row, Mizuhara draws the yasume 7p to win the hand. Mizuhara wins with Riichi/Tsumo/Pinfu for 1,300+100 all and takes back the riichi stick she gave up last hand.
South 1 – Honba 1
All Opponents (1,300+100 all) → Mizuhara Akina (Riichi/Tsumo/Pinfu)
Riichi: Mizuhara Akina
+1,000
+4,200
U-Next Pirates
18,000
⠀
-1,400
Sega Sammy
Phoenix
82,200
⠀
-1,400
Konami Mahjong
Fight Club
-25,800
⠀
-1,400
Akasaka
Drivens
25,600
S1-2
Dealer: Mizuhara Akina
Dora: 2p
In S1-2, Mizuhara starts out 4-shanten with a west ankou, while Kondo starts out 3-shanten with a likely tanyao hand. Kondo’s hand develops very quickly, getting to iishanten by turn 3. On turn 5, Kondo gets to tenpai and calls riichi on a 14p ryanmen wait. With the early riichi, Sasaki starts to bail. With Mizuhara and Taro within range of each other, both try to advance their hands. Mizuhara had to do a lot of waiting, but she manages to get to tenpai in the middle of the 3rd row. She decides to call riichi, waiting on a 47p ryanmen wait with the wall running out. The hand ends up going to ryuukyoku with Kondo and Mizuhara both tenpai.
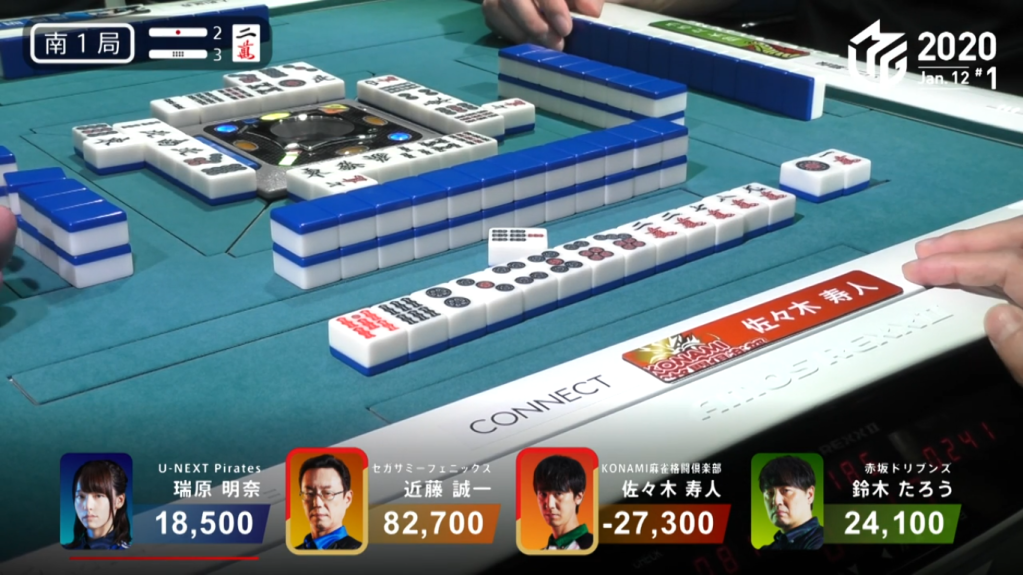
South 1 – Honba 2
Sasaki Hisato/Suzuki Taro (1,500 all) → Mizuhara Akina/Kondo Seiichi (Ryuukyoku)
Riichi: Mizuhara Akina, Kondo Seiichi
-1,000
+1,500
U-Next Pirates
18,500
-1,000
+1,500
Sega Sammy
Phoenix
82,700
⠀
-1,500
Konami Mahjong
Fight Club
-27,300
⠀
-1,500
Akasaka
Drivens
24,100
S1-3
Dealer: Mizuhara Akina
Dora: 2m
In S1-3, Kondo starts out 2-shanten with a pair of red dragons, while Sasaki starts out 4-shanten with a hand with tanyao or pinfu possibilities. By turn 4, Sasaki has all his ryanmen shapes ready, but is missing his pair. On turn 5, Kondo gets to iishanten and on turn 6, he gets to tenpai and calls riichi on a Red Dragon/West shanpon wait. During Kondo’s ippatsu turn, Sasaki pairs up his single dora to find his pair and get to iishanten. Mizuhara, who had little value and a small chance at winning, decides to call for tenpai and wait on a 1m/White Dragon atozuke wait, with the white dragon the only tile to give a yaku. A turn after Sasaki had gotten to iishanten, he gets to tenpai and calls riichi on a 47s ryanmen wait for mangan. In Sasaki’s ipptasu round, Kondo draws the 7s and deals into Sasaki. Sasaki wins the hand with Riichi/Ippatsu/Pinfu/Dora 2/Aka 1/Ura 1 for 12,900. He also takes along with him Kondo’s riichi stick and the two riichi sticks left over from the previous hand.
South 1 – Honba 3
Kondo Seiichi (12,000+900) → Sasaki Hisato (Riichi/Ippatsu/Pinfu/Dora 2/Aka 1/Ura 1)
Riichi: Kondo Seiichi
⠀⠀
U-Next Pirates
18,500
-1,000
-12,900
Sega Sammy
Phoenix
68,800
+3,000
+12,900
Konami Mahjong
Fight Club
-11,400
⠀⠀
Akasaka
Drivens
24,100
S2-0
Dealer: Kondo Seiichi
Dora: 4s
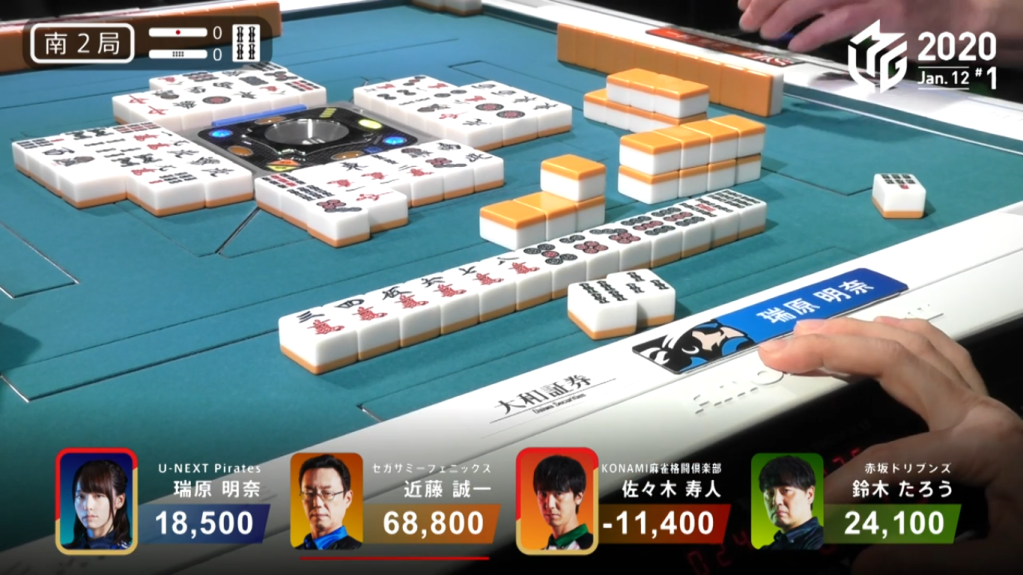
In S2-0, all four players start out 4-shanten. After discarding the usual terminals and honours, everyone had their hands improve greatly, with Taro and Sasaki getting to iishanten by turn 5. The iishanten stall curses the two of them, allowing Mizuhara to catch up to them and build her hand. Near the start of the 3rd row, Sasaki finally gets to tenpai and calls riichi on a 25s ryanmen wait. Trying to rush himself to tenpai, Kondo calls chii to get himself to iishanten and to break Sasaki’s ippatsu. Soon after, Mizuhara gets to tenpai and calls riichi on a 47s ryanmen wait. On Mizuhara’s very next draw, she finds the 7s to win the hand. Mizuhara wins with Riichi/Ippatsu/Tsumo/Pinfu/Ura 1 for 2,000/4,000, plus Sasaki’s riichi stick. This win puts her into 2nd place ahead of Taro.
South 2 – Honba 0
All Opponents (2,000/4,000) → Mizuhara Akina (Riichi/Ippatsu/Tsumo/Pinfu/Ura 1)
Riichi: Mizuhara Akina, Sasaki Hisato
+1,000
+8,000
U-Next Pirates
27,500
⠀
-4,000
Sega Sammy
Phoenix
64,800
-1,000
-2,000
Konami Mahjong
Fight Club
-14,400
⠀
-2,000
Akasaka
Drivens
22,100
S3-0

Dealer: Sasaki Hisato
Dora: 4s
In S3-0, everyone except for Kondo starts out with a 3-shanten hand. Sasaki develops his hand quickly, getting to iishanten by turn 4 with a pair of souths that he can call with. His hand stalls for a bit, but he manages to get to tenpai in the middle of the 2nd row, calling riichi on a 58s ryanmen wait. Facing a dealer riichi, everyone begins the bailing process. This process continued until the end of the hand, where Sasaki was the only one tenpai at ryuukyoku.
South 3 – Honba 0
All Opponents (1,000 all) → Sasaki Hisato (Ryuukyoku)
Riichi: Sasaki Hisato
⠀
-1,000
U-Next Pirates
26,500
⠀
-1,000
Sega Sammy
Phoenix
63,800
-1,000
+3,000
Konami Mahjong
Fight Club
-12,400
⠀
-1,000
Akasaka
Drivens
21,100
S3-1

Dealer: Sasaki Hisato
Dora: 2p
In S3-1, Sasaki starts out with a 3-shanten hand with no value. His hand doesn’t fare much better by the end of the 1st row, being only 2-shanten with one dora. Looking around the table, we can see that Taro is honitsu iishanten and Mizuhara is iishanten for pinfu. Near the start of the 2nd row, Mizuhara gets to tenpai and calls riichi on a 369p sanmenchan wait. During two runs later, Sasaki calls riichi himself, waiting on a 7s kanchan. On Mizuhara’s very next draw, she gets the 7s and deals into Sasaki. Sasaki wins with Riichi/Ippatsu/Tanyao/Aka 1 for 12,000+300, taking Mizuhara’s riichi stick and recovering his riichi stick from the last hand. The win puts him back into the positives.
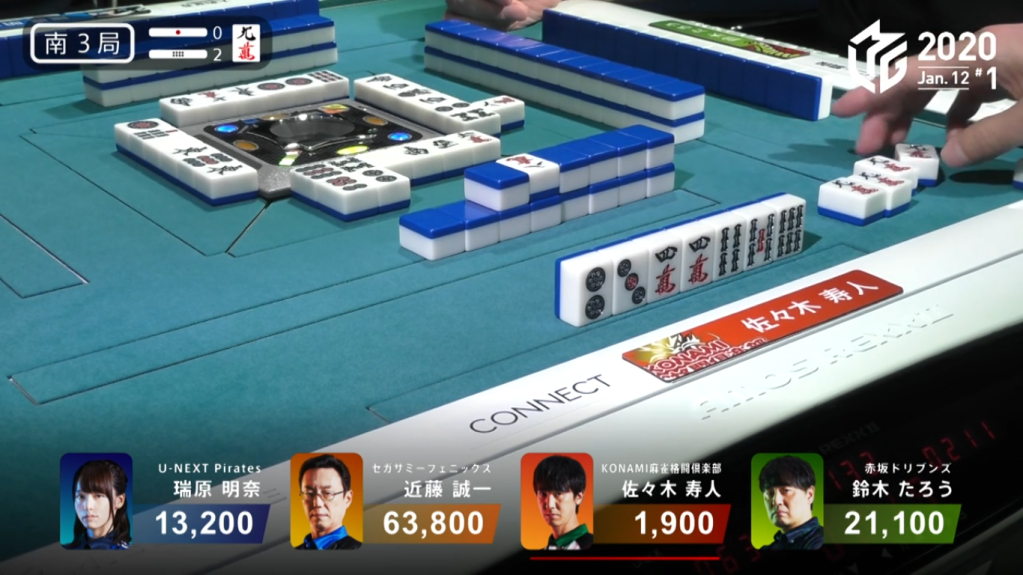
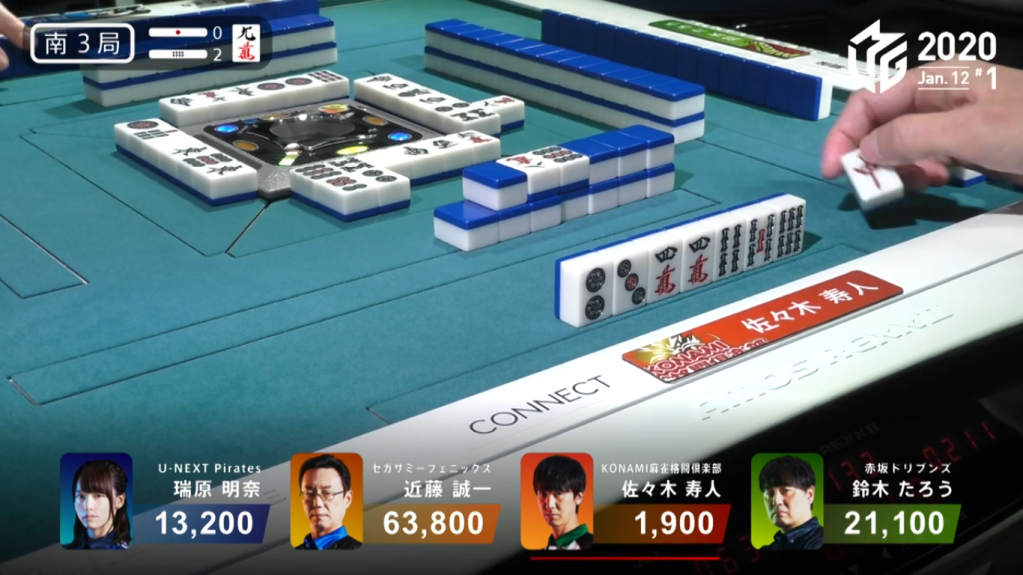
South 3 – Honba 1
Mizuhara Akina (12,000+300) → Sasaki Hisato (Riichi/Ippatsu/Tanyao/Aka 1)
Riichi: Mizuhara Akina, Sasaki Hisato
-1,000
-12,300
U-Next Pirates
13,200
⠀⠀
Sega Sammy
Phoenix
63,800
+2,000
+12,300
Konami Mahjong
Fight Club
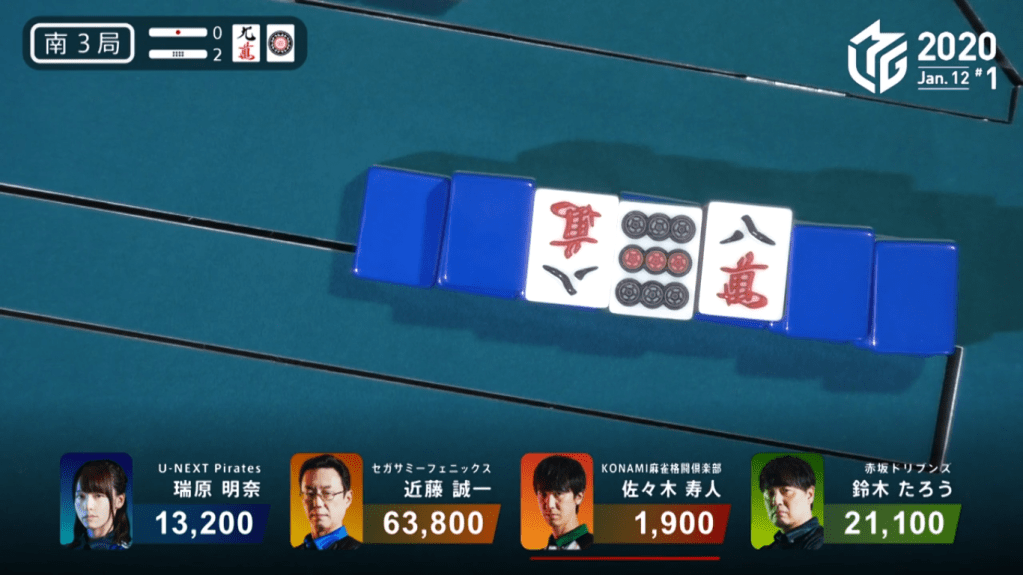
1,900
⠀⠀
Akasaka
Drivens
21,100
S3-2
Video: https://abema.tv/video/episode/444-7_s30_p277
Dealer: Sasaki Hisato
Dora: 9m
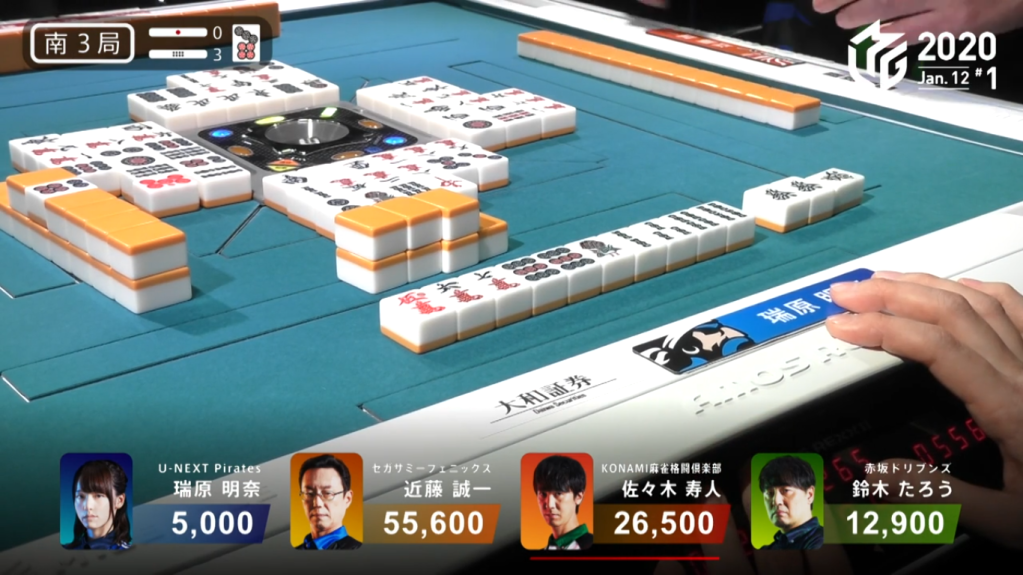
In S3-2, Sasaki starts out with an excellent hand to continue his comeback, holding an ankou of dora. Holding three different isolated yakuhai, Sasaki hopes to pair one of them up to speed up his otherwise slow hand. He is successful in finding one, pairing up the red dora on turn 3. Soon after, he is able to call pon on the red dragon to put him 2-shanten for a dealer mangan. By the end of the 1st row, Sasaki gets to iishanten with a guaranteed ryanmen wait. Two turns later, he gets to tenpai on a 14p ryanmen wait. When Mizuhara discards the 9m dora a few turns later, Sasaki makes a rare daiminkan call to increase his dora. The kandora doesn’t give any immediate dora, but it does make make the 1p, one of his waits, the dora. Sasaki draws the red dragon as the rinshan, making Sasaki call kan again. This time, the kandora gives him a huge immediate dora haul, revealing the 9m to be another dora and upgrading his hand suddenly to baiman. Though the rinshan misses again, it puts everyone on edge about the 24,000 open hand. On Sasaki’s next draw, he finds the 1p to win the hand with Red Dragon/Dora 9 for 8,000+200 all and to put him up to 2nd place.
This hand marks the highest dora count in a single hand. The old record was 8 dora set by Takizawa Kazunori back in 2018 and Wakutsu Akira back on November 12 this season.
South 3 – Honba 2
All Opponents (8,000+200 all) → Sasaki Hisato (Red Dragon/Dora 9)
Riichi: None
⠀
-8,200
U-Next Pirates
5,000
⠀
-8,200
Sega Sammy
Phoenix
55,600
⠀
+24,600
Konami Mahjong
Fight Club
26,500
⠀
-8,200
Akasaka
Drivens
12,900
S3-3
Dealer: Sasaki Hisato
Dora: 7p
In S3-3, Mizuhara has the most advanced hand of the bunch, being 3-shanten with a pair of green dragons and a red dora. By the end of the 1st row, Mizuhara is in iishanten with a chance at iipeikou. When Kondo discards the green dragon, she instantly calls pon to put herself tenpai on a 9p/4s shanpon wait. As everyone else continues to build their hands, all Mizuhara has to do is wait. In the middle of the 3rd row, just a Taro gets to tenpai, he discards the 9p and deals into Mizuhara. Mizuhara wins the hand with Green Dragon/Aka 1 for 2,000+900. With the win, it puts her within 2,100 points away from 3rd place Taro.
South 3 – Honba 3
Suzuki Taro (2,000+900) → Sasaki Hisato (Green Dragon/Aka 1)
Riichi: None
⠀
+2,900
U-Next Pirates
7,900
⠀⠀
Sega Sammy
Phoenix
55,600
⠀⠀
Konami Mahjong
Fight Club
26,500
⠀
-2,900
Akasaka
Drivens
10,000
S4-0
Dealer: Suzuki Taro
Dora: 4m
In S4-0, Mizuhara is within 2,100 points of 3rd place Taro. With this point spread, Taro can’t let the hand go to ryuukyoku and can’t let another player win a haneman. Mizuhara starts out with a 2-shanten hand with a single dora, just enough if she wins by tsumo. However, all the opponents will have to deal with Sasaki, who starts out 2-shanten with three dora and a ryanmen. By turn 3, Sasaki is already iishanten with four dora (two regular and two reds). On turn 4, Mizuhara also gets to iishanten, though her kanchan and penchan will slow her down significantly. On turn 5, Sasaki gets rid of his last terminal tile to give him a callable tanyao hand. In the middle of the 2nd row, Sasaki makes the call to put him tenpai on a 3p kanchan wait. On his very next draw, he gets the 3p to win the hand. Sasaki wins with Tanyao/Dora 2/Aka 2 for 2,000/4,000 to end the game.
For Taro, it means that he just barely held onto 3rd, being only 100 from 4th.
South 4 – Honba 0
All Opponents (2,000/4,000) → Sasaki Hisato (Tanyao/Dora 2/Aka 2)
Riichi: None
⠀
-2,000
U-Next Pirates
5,900
⠀
-2,000
Sega Sammy
Phoenix
53,600
⠀
+8,000
Konami Mahjong
Fight Club
34,500
⠀
-4,000
Akasaka
Drivens
6,000
Final Score
Sega Sammy
Phoenix
1st
53,600 (+73.6)
Konami Mahjong
Fight Club
2nd
34,500 (+14.5)
Akasaka
Drivens
3rd
6,000 (-34.0)
U-Next Pirates
4th
5,900 (-54.1)
Video: https://abema.tv/video/episode/444-7_s1_p111
Twitter: https://twitter.com/m_league_jikkyo/status/1348971049740689412
Summary
- E1-0: Kondo deals into Taro after Kondo tried to be the 3rd riichi in the hand
- E2-2: Kondo wins a dealer baiman after chasing Sasaki’s riichi and Sasaki deals the takame, Sasaki falls deep in the negatives
- East 2 reaches 5 honba
- Kondo gets to 82,500 by the end of E2 after starting E2-0 at 17,000
- E4-0: Taro declines tsumo and calls furiten riichi, draws the same tile later for the win
- S1-3: Sasaki gets revenge on Kondo by hitting him with a haneman on Sasaki’s ippatsu turn
- S3-1: Sasaki’s kanchan beats out Mizuhara’s sanmenchan
- S3-2: Sasaki calls a daiminkan of the dora 9m, draws a red dragon to let him kan again, reveals the 9m as dora again. Sasaki wins the hand the next turn by drawing the dora for Red Dragon/Dora 9, a new record for most dora in a hand
- S4-0: Sasaki gets more dora, wins with Tanyao/Dora 2/Aka 2 for mangan
- Taro holds onto 3rd place by 100 points/Mizuhara misses 3rd place by 100 points
- Game lasts 21 hands
- Sasaki goes from -27,300 in S1-2 and finishes the game with 34,500 (on his birthday, no less)
- Sasaki called riichi 11 times
- 7 hands in the game were won with ippatsu
